Angular Unit Testing Series - Episode #1: Getting Started
Setting up sample Angular Project
Have you ever found yourself in a situation where the time you’ve spent writing tests significantly surpasses the time you spent implementing the actual feature? Chances are you might have! Most devs have encountered this — especially when you’ve written all the code to implement a feature before actually starting to write any tests!
This is the very first episode of our Unit Testing Series with Angular. This series will comprise at least four articles covering several testing case scenarios.
In this article, we shall be going through how to set up an Angular application. In the next article, we will then use this application as our subject for unit tests.
What we will build:
A simple web application called, “Demystify” will connect to an external User Service API to retrieve a list of users which will render the user list data in a single table widget.
Project codebase status: GitHub link.

By the end of this chapter, you should be able to:
- setup a new Angular project
- create a fake service
- render data service in UI
Let’s get started…
Pre-requisites:
- NPM is installed. I’m on
version 6.14.8. - Angular CLI is installed.
version 11.1.4was used at the time of writing this article.

New Angular project setup
Let’s generate a new Angular application called Demystify
$ ng new demystifyYou will be prompted with a couple of questions.
Would you like to add Angular routing? Yes?
Which stylesheet format would you like to use? (Use arrow keys)
...
Add Angular routing and choose CSS as the stylesheet format because we’ll use the CSS version of Bootstrap in the future in our tutorial.
Eventually, it will generate the project's directory structure with the necessary files and the required dependencies installed.
Next, navigate inside the root folder of your project:
$ cd demystifyWe can then serve our Angular application (Demystify) with the command:
$ ng serveOur application will be served from http://localhost:4200/.
Setting up a fake service
In an ideal world, our application would need to be served with user service data from a real and actual provisioned backend server, supported with a database under the hood. However, in our case, we will rather be serving our Demystify application with a fake external user service. Therefore, we shall leverage MyJSON Server to create our fake remote REST user service with the following steps.
- Create a repo on GitHub
- Create a
db.jsonfile in that repo - Add the fake service’s JSON schema. In my case, I have populated quite a number of users in the
db.jsonfile in my Github repo. A useful tip/trick to remember is the parent key,users, to be able to directly target our users resource. - Now, visit the fake user service via the resource URL format like this:
https://my-json-server.typicode.com/<GITHUB_USERNAME>/<REPO_NAME>/<RESOURCE>Feel free to visit the one I created here. Also, it is worth noting that we can query user information by their respective id. Example: https://my-json-server.typicode.com/pkErbynn/user-service-mock/users/1
Adding a user service
We are now going to create a User Service in the Angular application that will act as a HttpClient that establishes a Http connection, connects to the User API mock service, and retrieves the User data. First, we will need an interface to represent a single User Entity.
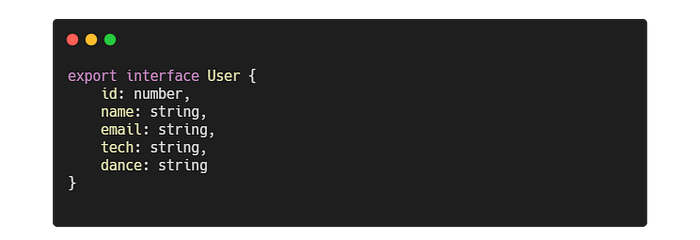
Run the following command at the root of the demystify project directory to create a User Entity. This will be generated in /src/app/interfaces directory.
$ ng g i interfaces/userGive the user interface the following properties — id, name, email, tech and dance. This model will be used to bind the User data to the component.
Let’s run this command to generate a service layer. This will place the User Service inside a src/app/services directory.
$ ng g s services/userThis service contains a getUsers() method that uses the HTTPClient module which is injected into the UserService class by adding private http: HttpClient to the constructor as shown below.
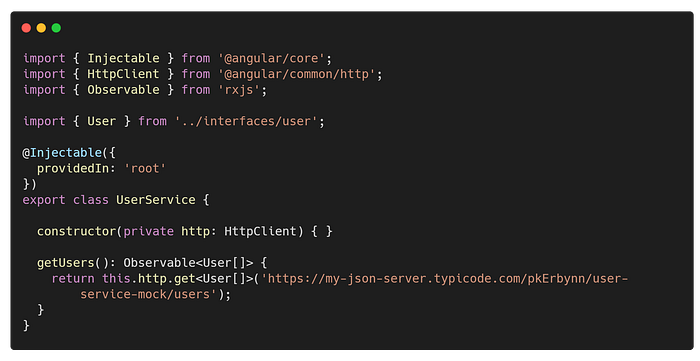
A get request is invoked to fetch our user data and deserialise it using our User Interface typed, User[].
User list component
Our Demystify application will need to display a list of users therefore we will generate a user-list component, inside src/app/components, to populate the users on the UI.
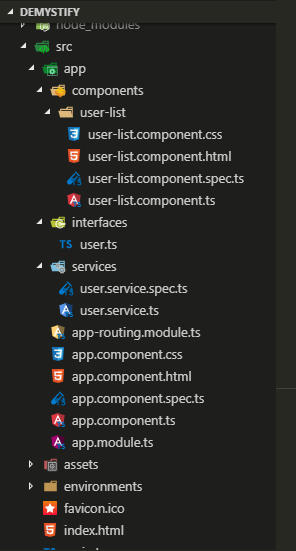
$ ng g c components/user-listAfter generating the service, interface, and component, you should have a file structure like this:
Whenever we navigate to the /user-list route in the browser, the UserListComponent should be rendered. Likewise, the base route. Configure routes inside the app-routing.module.ts.

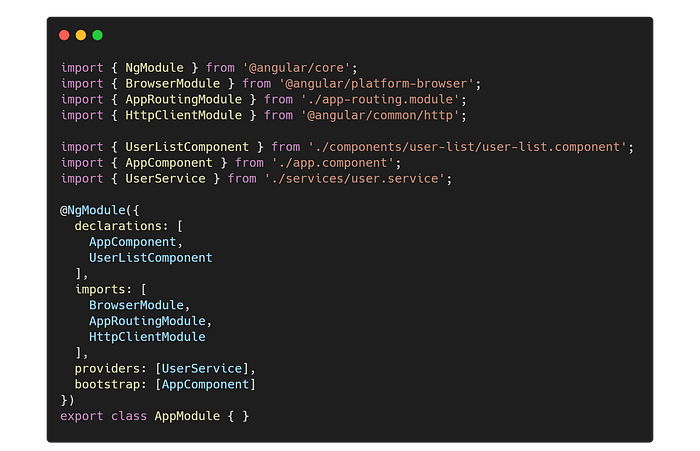
Despite that Angular CLI automatically registers modules, let’s verify if UserListComponent is declared, HttpClientModule is imported, and UserService is provided. Here is how it should look like:
Now, let’s make use of the UserService in the UserListComponent. Once we fetch the data from the service layer to the component layer, we set the data to the users property which shall be exposed and accessed at the template layer for display.
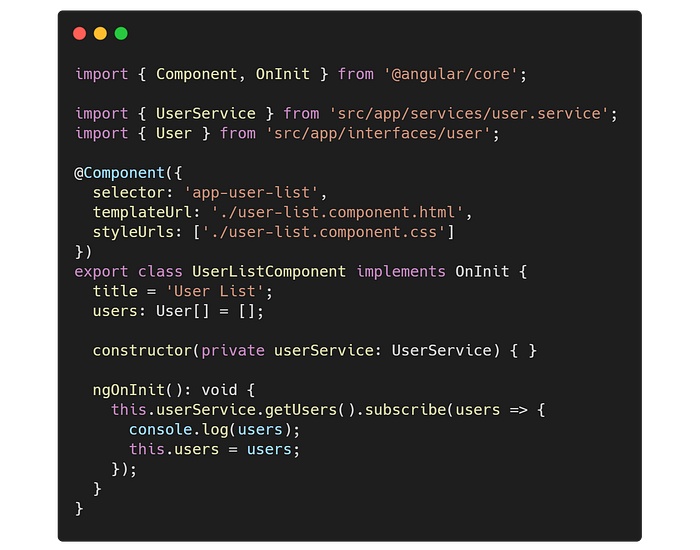
Since the .getUsers() returns an observable we subscribe for the data stream. The data is being logged to the console to view the result beforehand.
Display user list
Next, we are going to dynamically load different components based on the activated component or current route state. To do this, hook a router outlet in the app.component.html (I customized and maintained only the bootstrapped header code block and its styling as well).
<router-outlet></router-outlet>If everything goes well, while the server command ng serve is still running, you can open the app at http://localhost:4200/user-list and you should find the user list component rendered in the browser, displaying “user-list works!”.
Finally, let’s update the user-list.component.html with the following code to render the user data. I added some styling to the user-list.component.css.
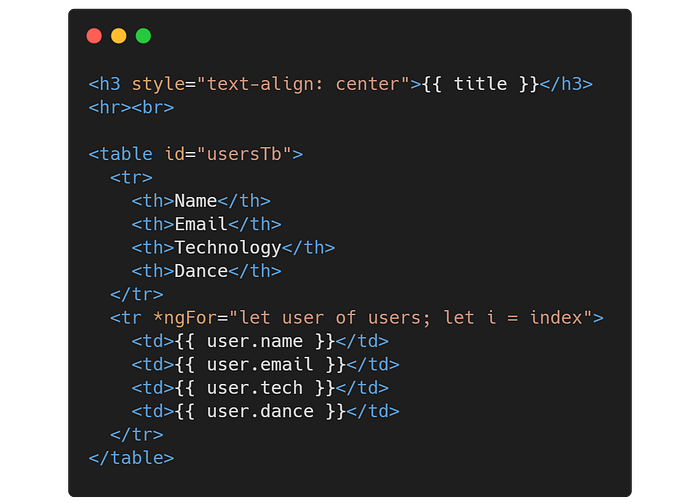
When all is done, this should successfully display the title and a nice-looking table with the users’ information as illustrated by the image at the beginning of this article. :)
Conclusion
We walked through how to set up a simple Angular application from the ground up with a remote mock service, but we have no tests! The downside of this is that the application can break as it grows while adding new features, so in the following article, we will look into creating tests for our application to ensure that individual parts of our application are scrutinized for proper operation and validation.
If you found this article useful, you can follow me here, or on Github for more.
Project codebase status: GitHub link.
Thanks for reading! :)
